
I spent an unnecessarily long amount of time doing mini-preps last month. As was expected of every Ph.D. scholar who has been in a similar situation (which is 99% of us), I would sulk every evening, wake up the next day, pray to the flying spaghetti monster and start over.
Because a Ph.D. is 9 failures and 1 break-through. (whatever keeps you going)
So this is a troubleshooting guide of things that went wrong and other things that may go wrong in the technique.
I am using Qiagen’s kits for my plasmid isolation (I don’t get paid to share the link, it’s just for giving credit where it’s due)
Know your plasmid isolation kit
Qiagen is just one of many brands that provides plasmid isolation kits. Some others include-
- Monarch Plasmid Miniprep kit, which prides itself on not requiring to use RNase in the resuspesion buffer. I find this expensive but it works great for low copy number plasmids or large (>20kb) plasmids (you know the ones I’m talking about! Those pesky ones which have stable expression problems).
- Roche’s High Pure Plasmid Isolation kit, which prides itself on better sensitivity but I don’t have the funds.
- PureYield Plasmid Miniprep System by Promega, which I would recommend if you have a high plasmid copy number. This kit has a 10 minute protocol. It skips the isopropanol precipitation step or any extensive centrifugation (very similar to Qiagen’s spin column Miniprep kit). What I found interesting here is that they have a short endotoxin removal step in Promega’s kit which may help in case of further downstream steps.
- Zymo research offers Plasmid purification kits from both E. coli strains and yeast. I have worked with Zymo’s viral RNA extraction kits and they are very cost effective, so I’m willing to put my money on their kits at least once.

While there are quite advanced kits in the market. I have mainly worked with Qiagen kits and even Qiagen has multiple kits, which brings me to my second point,
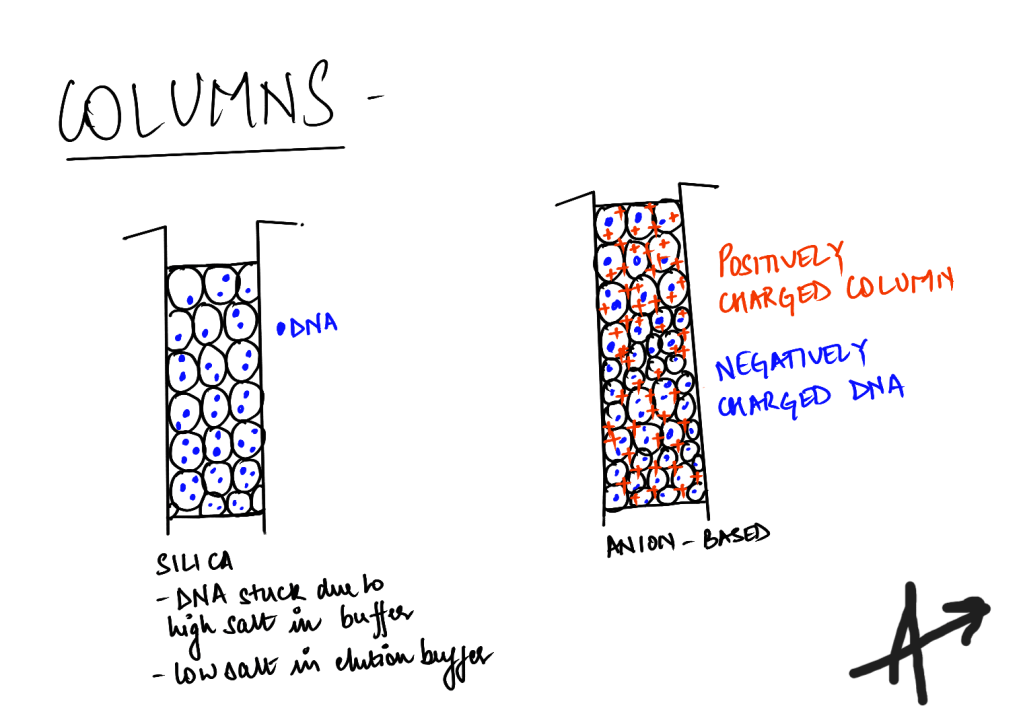
Know your columns
- Resin columns : these anion exchange columns have diethyl aminoethanol (positively charged DEAE) which selectively binds to dsDNA (negatively charged phosphate group in the backbone).
- Silica membrane columns : In this case, the DNA binds to silica columns under high salt (chaotropic) conditions (in the wash buffers), removing other impurities and can be eluted later. Qiagen also offers non-chaotropic silica membrane columns, in case of sensitive cell lines or enzymatic modifications like methylations, phosphorylation, which may be affected by the high salt in buffers.
- Magnetic bead-based columns : Thermo-Fisher also offers a ChargeSwitch technology with magnetic beads. They say that at a low pH, the beads bind to negatively charged DNA which is eluted later. This efficiently reduces the impurities. I am assuming that their neutralization and/or wash buffers are probably acidic while their elution buffer has high pH. Be careful if your DNA is modified.
There are also spin columns, vacuum columns and gravity-based columns.
For mini-preps, I have used spin columns which allow fast isolation. Midi-prep and maxi-prep do use vacuum columns and gravity-based columns. Vacuum columns are more expensive but faster.
Do these make a difference? Probably in the amount of time taken to finish the procedure. Though the plasmid yield may depend on the type of column used.
P.S. remember to use the correct protocol and buffers from your kit only. Do not mix and match buffers.
I once confused the Qiagen Midi-prep protocol for their Mini-prep Spin column 2.0 protocol. Not only did I take a lot more time and low yield, but also my Midi-prep protocol was for gravity-based resin columns instead of the Spin columns that I was using. All the time, I kept wondering why the buffers weren’t seeping through the columns due to gravity, before one of my seniors laughed his head off and asked me to “spin” it down in the centrifuge.
N3 Buffer v/s P3 Buffer
P3 and N3 are buffers in Qiagen kits. P3 buffer is usually used in Midi-prep while N3 buffer provides good yield in Mini-prep Spin Columns. While they are both neutralization buffers (to stop cell lysis), they both have different compositions (and I have tried to use them interchangeably, but I can confidently say, for Mini-prep, please just use N3 buffer for awesome yield!)
N3 buffer has guanidine chloride (provides the high salt conditions) along with potassium acetate and is great for the silica-based Spin Column 2.0 they have provided with the kit.
P3 buffer has potassium acetate and chaotropic agents. It works well for the gravity-based resin columns that are routinely used in Midi-prep kits.
Thus, do not use these interchangeably and then wonder why your DNA hasn’t eluted properly.
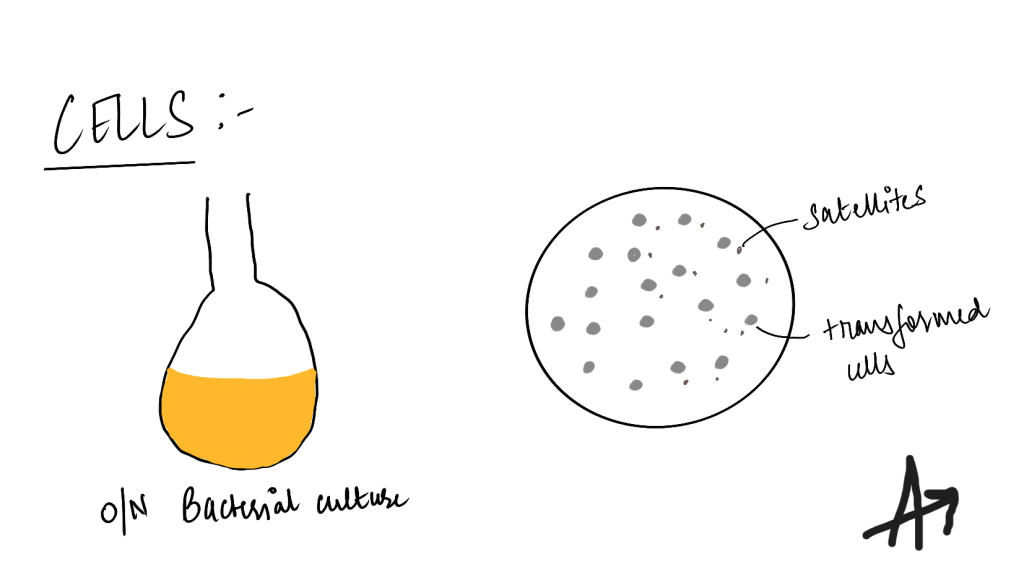
Incubating the transformed cells overnight
Once the cells are transformed, an aliquot is spread on selective agar plates. I usually plate anywhere between 20-50ul/plate. After that, one colony is selected and added to a small volume (5ml) of selective media (eg. antibiotic selection) and grown for 5-6 hours before pouring the cells into a larger quantity (100ml) to be grown overnight (12-16 hours), before plasmid isolation.
Points where you can potentially go wrong-
- Incubating transformed cells for not more than 16 hours, as this will lead to the formation of satellite colonies.
The transformed cells usually produce (and secrete) antibiotics (if its antibiotic selection) into their vicinity. In an overgrown plate, these antibiotics will degrade the antibiotic in the media, allowing for small “untransformed” cells to also grow. The colonies are smaller and so called “satellites.” - Most people also use the spectrometer readings to estimate growing their cultures instead of time as time can be deceiving, with different bacteria having variable growth curves or if your initial inoculum was high to begin with.
Plasmid expression is maximum when the bacteria is in late log phase with an OD600 of 1.5-2.0. - Low copy number plasmids may require longer time periods. Eg. 20 hours (although I usually see a lot of satellite colonies by this time, but if it works for you, why not?)
- High copy number plasmids may require very little time. If you’re doing a mini-prep, taking a single transformed colony in the morning and growing it in 5ml of selective media/broth for 5-6 hours is enough for high yield.
For more information, Addgene has some amazing blogs for inoculating bacteria in selective broth and for optimizing plasmid yield which I have referred to as well!
Using the right cells for your plasmid
I will be sticking to bacterial cells for this section.
- Is your plasmid compatible?
Some bacterial cells already have plasmids. If your plasmid isn’t compatible with the pre-present plasmid, it is called incompatibility. This occurs when the plasmids have to compete for the same replicon (ori site and replication control machinery).
This may lead to lower yield of your plasmid of interest due to lower plasmid replication. The plasmid may show inconsistent copy numbers and be lost over generations. - Can your cells stably express the plasmid?
Large sized (>12kb) plasmids require different strains.
Escherichia coli strains are routinely used for standard plasmids and cloning. There are two strains – the K12 strain, which maintains plasmid integrity and high transformation efficiency and the B strain (eg. BL21) which excels in protein expression due to T7 promoter induced expression and lower protease activity. B strains also have a higher tolerance for toxic proteins.
Some commercially available competent cells:
| DH5α cells : Derived from E. coli K12 strain. | – High transformation efficiency (10^8 cfu/ug) – Routinely used for cloning, blue/white screening, standard plasmids. |
| DH10B : Derived from E. coli K12 strain. | – Also called Top10 cells. Routinely used for cloning – High transformation efficiency (10^9 cfu/ug). I find these better than DH5a cells. |
| Stbl2, Stbl3, Stbl4 cells : Derived from E. coli K12 strain. | – Especially made for unstable or repetitive DNA or larger constructs. – Transformation efficiency is moderate- 10^6-10^8 cfu/ug. |
| NEB Stable : Derived from E. coli K12 strain. | These are commercially available at the NEB website, made for unstable constructs. |
Commercially available competent cells have multiple mutations to enable stable plasmid expression.
| endA : endonuclease I mutation | Improves plasmid yield by preventing non-specific cleavage of dsDNA by endonuclease I |
| gyrA : DNA gyrase mutation | Provides antibiotic resistance (nalidixic acid); Provides stable expression of plasmid DNA |
| dam/dcm : DNA adenine methylase and DNA cytosine methylase mutation | Helps methylation sensitive restriction enzymes to cut DNA |
| F : F plasmid (F’/F-) | Fertility plasmid is a low copy number plasmid from the lncF group and most plasmids are usually compatible with F plasmid. |
| recA : recombinase mutation | Prevents recombination of plasmid with genomic DNA and helps in stable maintenance of plasmid |
| fhuA : T1/T5 phage resistance | Resistance against infection from bacteriophages/viruses. |
Some other mutations are listed on Addgene‘s blog.
Use that second elution
Many people have advised me to spin the column twice in elution buffer. While the yield from the second elution would be less than half of the first, I guess it’s great to get the maximum yield possible.
Wait for biology (or chemistry) to do its thing
After adding lysis buffer, wait for 5-10 min, for the cells to lyse.
After adding neutralization buffer, invert mix and wait for 5 minutes to neutralize the lysis reaction, before centrifugation.
After adding elution buffer in the column, wait for 5 minutes for the DNA to unbind to the column, before centrifugation.
Basically, keep calm and let biology do it’s thing.
I think that’s the last time I will make a keep calm joke (he he)
Best of luck on your own plasmid isolations!!

Leave a comment